Thứ Ba, 3 tháng 7, 2012

Beef and Bean Burritos


I'm really getting into beans lately. They're so good for you and versatile to boot. I really need to start keeping a few cans in the pantry for those nights when I don't know what to make for dinner. I remember one of my favorite meals when I studied abroad in England was pasta with tomatoes, red or green bell pepper, onions, garlic and a can of red kidney beans. I cooked all the veggies in olive oil and the oil made a nice sauce for the pasta. It was delicious.

But, I digress. This post is about these Spicy Beef and Bean Burritos, which Jill thoughtfully posted on the day I was planning to make Beef Tostados only to realize the night before that I'd used up all the bacon. Can't make homemade refried beans without bacon (well, you probably could but why would you want to?) And thus these burritos were born.

I omitted the can of black beans from the original recipe, subbing in one pound of ground beef since I'd already defrosted it for the tostados. I also left out the chipotle pepper since I wanted Baby Girl to eat it and swapped the cucumber for avocado since I had one in the fridge that needed to be used up. This recipe makes a ton of filling, so I ended up freezing about half of it. That will come in nice and handy when I need another fast dinner. I made a quesadilla with the leftover filling for lunch the next day that was positively lip-smacking. Unfortunately my tortillas were fajita-size so the burrito I attempted to photograph wasn't really big enough to cut in half, but it was still delicious.

Thanks for saving the day, Jill!

Spicy Beef and Bean Burritos
Modified from Annie’s Eats, as seen on JBean Cuisine

2 teaspoons olive oil
1 small onion, diced
1 lb ground beef
2 cloves garlic, grated or minced
1 teaspoon chili powder
1 teaspoon minced chipotle in adobo sauce (I omitted)
1 teaspoon ground cumin
1 small pinch of cayenne pepper
1 (15 oz.) can black beans, drained and rinsed
1/3 cup water, vegetable broth or chicken broth
Salt and pepper to taste
6 tablespoons of your favorite store-bought salsa

For serving:
6 (9- or 10-inch) flour tortillas, warmed
Shredded cheddar cheese
Diced cherry tomatoes
Shredded romaine lettuce
Diced red onion
Diced avocado
Low-fat sour cream or Greek yogurt
Diced cilantro

Heat the oil in a skillet over medium-high heat. Add the onion and sauté until translucent and slightly brown. Add the beef and cook until no longer pink. Drain off any fat. Add the garlic, chili powder, chipotle, cumin, salt and cayenne; stir, cooking just until fragrant, 30-60 seconds. Add the beans and the water or broth to the skillet. Season with salt and pepper. Bring the mixture to a boil. Reduce the heat to medium-low and allow the mixture to simmer for 10 minutes. Remove the skillet from the heat and stir in the salsa.

Spoon about a third of a cup of the bean mixture down the center of each tortilla. Top each serving with a pinch of shredded cheese, tomatoes, lettuce, onion, avocado, cilantro and sour cream. Roll the tortilla up tightly, burrito style, and serve immediately.

Thứ Hai, 2 tháng 7, 2012

Pasta Carbonara with Corn


One of my good friends, and senior year of college roommate, L, came to visit last week. She's a California girl and was back home visiting her family. I'm so glad we were able to get together while she was in town and even more excited that I got to cook for her. We met our junior year when we both studied abroad in England, so it seemed fitting that I had Pasta Carbonara with Corn on the menu the night she ate with us. As I mentioned waaaaay back in August 2006 when I first started this blog, I discovered carbonara in England (of all places) my junior year abroad with my very dear friend, S. We ate it everywhere we could find it. Making carbonara with L, even this variation with the corn, brought back memories of our time together in England. Man, we had a blast. Hard to believe it's been 11 years already.


Anyway, this luscious carbonara was inspired by this Rachael Ray recipe for Pasta Carbonara with Corn and Chiles. I had great success adding asparagus to my carbonara, so corn seemed like a great idea. I ended up combining my usual method for making carbonara with the flavor profile from Rachael's recipe, omitting the chiles because I didn't want it to be spicy.


This was a real winner that would be even more amazing with fresh Jersey corn straight off the cob. You all know my carbonara obsession is legendary but the addition of the corn was wonderful. I love crunching those kernels under my teeth. This is a great summer version of carbonara, made lighter by the corn and the fresh herbs. Everyone cleaned their plates, including Baby Girl.

Pasta Carbonara with Corn
Inspired by Nigella Lawson and Everyday with Rachael Ray

1 pound spaghetti
1/2 lb bacon, chopped
1 large onion, sliced
2 cups corn
4 cloves garlic, minced
2 tablespoons fresh thyme, chopped
1/2 cup parsley, chopped
1/4 cup vermouth
4 eggs
1 1/2 cups freshly grated Parmesan
1/4 cup heavy cream
Freshly ground black pepper
Freshly ground nutmeg

Put a large pan of water on to boil for the pasta. Cook the pasta according to package directions.

In another large pan that will fit the pasta later, cook the bacon until crispy but not crunchy. Add the onions and cook until softened and starting to caramelize, about 15 minutes. Add the corn and garlic and cook for 5 minutes. Add the thyme and parsley, then pour in the vermouth and let it bubble so that, after a few minutes, you have a small amount of salty winey syrup left. Take the pan off the heat.

In a bowl, beat together the eggs, Parmesan, cream, pepper and nutmeg. When the pasta is done, remove approximately 1/2 cup of the pasta water before draining. Add the drained pasta to the bacon and corn mixture, tossing well to coat with the syrupy sauce. Add the eggs and cheese mixture, swiftly tossing everything to mix. Thin with pasta water, if needed. Grind over some more pepper to serve.

Chủ Nhật, 1 tháng 7, 2012

Weekly Menu - Week of July 1, 2012


July 1. How the heck did that happen? I hope everyone is enjoying their summer so far. We haven't been down the shore nearly enough yet, but I'm hoping to remedy that soon with another trip down to soak up the sun and the cool sea breeze. Not to mention a delicious breakfast at our favorite spot.

I'm excited about all the dishes on this week's menu. I'm also excited about having Wednesday off to celebrate July 4th with my family and friends. Have a safe and happy week!

Saturday - I'm making this Creamy Macaroni Salad to bring to our friend's house. We'll eat lunch, the kids will play, we'll go for a swim. It's going to be glorious (although by the time you see this we'll have already been there and back. Ah, the power of scheduling posts).

Sunday - I wanted a simple dinner so I'll take the opportunity to make my swap meal for the Vegetarian swap.

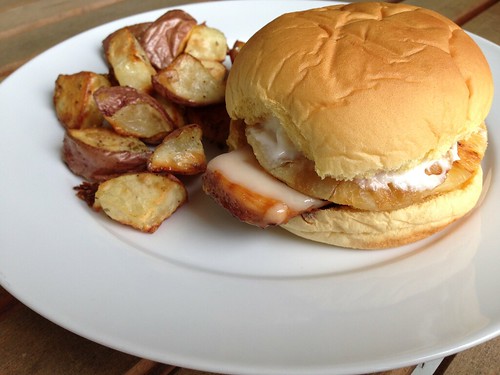
Monday - I loved these Hawaiian Chicken Sandwiches so much I had to make them again. I'll serve them with oven fries.

Tuesday - My exercise class is on a break this week due to the holiday. I'll make another meal from the recent issue of Cook's Country (this one is premium content so I can't link to it) - Skillet Penne with Chicken and Broccoli. I love a good one-pot meal.

Wednesday - Celebrating the 4th of July with friends. We'll have the usual burgers, hot dogs and I want to use up 4 chicken legs in the freezer so we'll boil them on the stove, slather them with BBQ sauce and finish them on the grill. I'm also going to make this Antipasti Pasta Salad (adding in some provolone and artichoke hearts), as well as this Cantaloupe and Mozzarella with Proscuitto and Basil salad.

Thursday - These BLT wraps will be perfect after yesterday's busy day. I'll serve the leftover sides from July 4th alongside.

Friday - Out for dinner to celebrate the end of the work week!

Thứ Sáu, 29 tháng 6, 2012

Recipe Swap - Balsamic Caprese Panini

Oh caprese, how I love you. I kinda have a thing for all things caprese, in case you haven't noticed.


So I was, of course, thrilled when I received my recipe for the Burger/Sandwich Swap. Not only was it one of my good friend Jaida's recipes, it was something I've had my eye on every since she posted it. The Balsamic Caprese Panini combines my love of caprese ingredients with the tang of balsamic vinegar and the crunch of crispy bread. I couldn't wait to make it.


Like Jaida, I had some trouble with this sandwich. I used a nice, crusty roll to combat the wetness of the tomatoes and fresh mozzarella, but I had forgotten to take the roll out of the freezer before I started cooking so that was problem #1. Problem #2 arose when I got careless. I was patting myself on the back, proud of how well my sandwich was cooking in a skillet with a brick to weigh it down. Then, since everything was going so well, I walked across the kitchen to clean up a bit and the next thing I knew the brick was sliding, taking the top half of the sandwich with it. I managed to salvage the sandwich, and it was positively delicious, but not exactly photogenic. No matter. I had plenty of fresh mozzarella, tomato and basil and I planned to try again for lunch another day.


The photos are attempt #2 and as you can see it was still a mess. Ingredients sliding every which way. This is a messy sandwich, folks. The juicy tomatoes and moisture in fresh mozzarella conspire against you. I tried adding more cheese so I could have three layers to sort of glue everything together, but that didn't work. You could maybe shred the fresh mozzarella instead of slicing it or just make it and deal with the mess.

I made only one modification and that was to swap the oil for a little mayo. I used about 1 tablespoon for my sandwich and mixed it with the balsamic to create a balsamic mayo. Holy yum, folks. Thankfully I had a little leftover to dip my sandwich in. I'm trying to think of other ways to use balsamic mayo, perhaps on a sandwich with some arugula and proscuitto?

Big thanks to Jaida for an awesome sandwich recipe!

Balsamic Caprese Panini
Slightly Modified from Sweet Beginnings
Makes 1 sandwich

4 slices of tomato (I used beefsteak tomatoes)
Salt and pepper, to taste
A splash of balsamic vinegar
1 tablespoon mayo
3 oz fresh mozzarella, sliced
9 basil leaves, stems removed
2 slices crusty bread
Cooking spray

Sprinkle the tomato slices with salt and pepper. In a small bowl combine the mayo and balsamic vinegar. Stir to combine. Spread half the mayo on each slice of bread (if you have leftover, you can dip the sandwich into it later). Place alternating layers of tomato and mozzarella slices on the bottom bun (2 layers of each). Place the basil leaves on top and top with the other bread slice.

Heat a skillet or panini press over medium-low heat. Spray the pan with cooking spray and place the sandwich in gently. Spray the exposed slice of bread with more cooking spray, then top with a sheet of tin foil. Weigh down the sandwich with a heavy skillet, a brick covered with tin foil (what I used) or a plate with some cans stacked on top. Cook 5 minutes, watching the sandwich carefully as the contents will shift as they cook. Flip over and repeat on the second side.

Cut in half and serve.

Thứ Năm, 28 tháng 6, 2012

Hawaiian Chicken Sandwiches

I love the combination of chicken and pineapple. I first had it in this summer staple, Pineapple Chicken Salad, and then these delicious Grilled Chicken and Pineapple Quesadillas. These Hawaiian Chicken Sandwiches received rave reviews on my cooking board, so I knew I had to make them.

Hawaiian chicken sandwiches

All I can say is wow. No wonder these were a favorite in Katie's house growing up. They couldn't be simpler yet the flavor is outstanding. Marinating the chicken overnight imparts such great flavor, so don't skip that step. Unfortunately we were out of charcoal so I had to cook these inside on the stovetop. I think the smokiness from the grill would only enhance the flavor. These are definitely a winner. I even strong-armed SP into sharing a second sandwich with me. I couldn't stop thinking about them and almost cried when SP inadvertently took the only leftover sandwich to work the next day. I guess I'll just have to make them again next week.

The only change I made was to add a smear of mayo to the top and bottom buns. I loved the way the marinade on the chicken and the juice from the pineapple mixed with the mayo. I also doubled the recipe so we'd have leftovers for lunch (although obviously not enough leftovers). If you like chicken and pineapple you NEED to make this. Thanks for an amazing recipe, Katie!

Hawaiian Chicken Sandwiches
As Seen on So Tasty, So Yummy

2 large boneless skinless breast of chicken
1 large can pineapple rings (8 rings)
2 tablespoons soy sauce
2 tablespoons brown sugar
2 teaspoons Dijon mustard
4 slices provolone cheese
4 hamburger buns or kaiser rolls
A smear of mayo

Pound out the chicken breasts and slice each into two pieces. Combine the juice from the pineapple can, soy sauce, brown sugar and mustard. Marinate the chicken overnight in the the juice mixture.

Prepare your grill. Grill the chicken for 15 minutes, flipping once halfway through. Add the cheese with 3 minutes left. While the chicken is grilling, add the pineapple rings halfway through, turning once. Smear some mayo on the buns, then top with a piece of chicken and two pineapple rings each.

Thứ Tư, 27 tháng 6, 2012

The Best Macaroni Salad Ever


I know The Pioneer Woman is a brand. I get that she has to make over the top claims about things because people expect her to have the best of the best recipes. That's fine. She's obviously doing quite well for herself. But is her claim that this is The Best Macaroni Salad Ever actually valid? Ehhh...not necessarily.

I rarely make macaroni salad at home but whenever we've bought it at the store I remember why I dislike it so much. See, there was a Jewish deli in my hometown growing up that made THE BEST (and yes, I stick by that statement) macaroni salad I'd ever tasted. It was simple, not too gloppy from mayo and perfectly seasoned. Sadly, the deli closed its doors a decade ago and I have yet to find macaroni salad that's as good. Now this recipe is completely different from any macaroni salad I've had. As SP pointed out, there's no carrot or celery. Instead you have olives and roasted red peppers. But I figured it was worth a shot.


I cut the recipe in half since it was just the two of us and that was perfect for dinner (including going back for seconds and thirds) plus lunch the next day. I'd say half the recipe makes 6 servings. I'm not sure what kind of pickles she was recommending so I just used the hamburger dill slices we had in the fridge. I'm sure whatever pickle you like would work just fine. I reworked the directions below because nothing irks me quite like a recipe ingredient list that doesn't go in the order of the instructions.

We both enjoyed this, especially the fact that it wasn't overly mayo-ed, but it wasn't quite what either of us were looking for in the perfect macaroni salad. I think I'll keep the base (mayo, pickles, vinegar) and swap the red peppers and olives for carrot and celery. I'll report back since I envision plenty of grilling opportunities this summer.

The Best Macaroni Salad Ever
As Seen on The Pioneer Woman

4 cups elbow macaroni
3 whole roasted red peppers, chopped
1/2 cup black olives, chopped fine
1/2 cup diced pickles (I used dill, any type would work)
3 green onions, sliced (white and dark green parts)
1/2 cup mayonnaise
1 tablespoon red wine vinegar
3 teaspoons sugar
1/4 teaspoon salt
Plenty of black pepper
1/4 cup milk (more if needed)
Splash of pickle juice

Cook the macaroni in lightly salted water according to package directions. Drain and rinse under cold water to cool, then put in a large bowl. Add the roasted red pepper, olives, pickles, and green onions. In a small bowl, mix together mayo, vinegar, sugar, salt, and pepper. Splash in enough milk to make it pourable. Splash in pickle juice for extra flavor. Taste and adjust seasonings as needed. Add dressing to the macaroni and toss to coat. Add more of any ingredient you'd like

Chill for at least 2 hours before serving. Stir and serve.

Thứ Ba, 26 tháng 6, 2012

Blueberry Muffins with Strudel Topping


Lately we've been buying a big container of blueberries at the supermarket. They pair beautifully with strawberries and bananas in smoothies and SP likes to take them to work as a snack. He was out of town for three days this past week and the blueberries were getting old fast. I needed something to make with them and then it hit - a craving for muffins. The first recipe I tried was a bust but then I was pointed in the direction of this recipe for Blueberry Muffins with Strudel Topping . Thankfully I had plenty of blueberries to try again.


Excuse the holiday muffin liners. I didn't realize they were Christmas liners until I was looking at the photos. Gingerbread men and Christmas trees in June? Eh, what can you do? Regardless of the wrappers, these were divine. The topping provides a great crunch and the muffin itself is cakey, sweet and bursting with blueberry goodness.

Blueberry Muffins with Strudel Topping
As Seen on Fried Ice and Donut Holes, originally from Annie’s Eats

1 1/2 cups all-purpose flour
3/4 cup sugar
1/2 teaspoon salt
2 teaspoons baking powder
1/3 cup vegetable oil
1 egg
1/3-1/2 cup milk
1 cup blueberries

Topping:
1/4 cup sugar
2 tablespoons + 2 teaspoons all purpose flour
2 tablespoons butter, softened
3/4 teaspoon cinnamon

Preheat oven to 400. Line 8 muffin cups with paper liners (I got 9 muffins and I still think they were a little big, so I'd go for 10 and have more, slightly smaller muffins).

Whisk together flour, sugar salt, and baking powder. Pour vegetable oil in a 1-cup glass measuring cup. Add the egg and enough milk to make 1 cup of liquid. Whisk together, then slowly whisk into flour mixture. Fold in blueberries. Scoop into lined muffin cups.

Combine topping ingredients, mixing with a fork until crumbly and combined. Sprinkle over tops of muffin batter.

Bake for 20-25 minutes. Let cool in muffin tin for 10 minutes, then remove to wire rack and allow to cool completely.