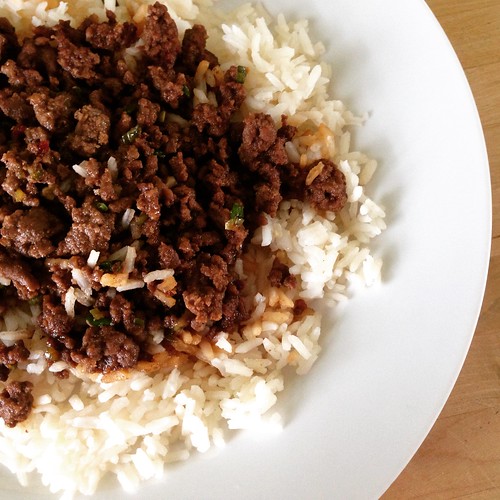
This is one of those recipes that makes you wonder how something with so few ingredients (and pantry staples at that) can come together into something downright magical.
Amy's post about this Cheater Korean Beef recipe made it sound like one of the best things she's ever made so, of course, I was intrigued. I trust her judgement when it comes to food, and after a quick glance at the ingredient list I figured it would make a quick and easy weeknight meal.
What I wasn't expecting was for it to be so delicious I was fighting my 5-year-old for a second helping. And wishing my husband had other dinner plans that night. Seriously, this is so utterly amazing, there are no words. And it's ridiculously easy. So easy that said 5-year-old could probably cook it herself. You know, if she was allowed to use the stove.
Make this one soon. You won't be sorry.
Cheater Korean Beef
As seen on Very Culinary
Serves 2 (so double it or make a side dish if you want leftovers)
1 tablespoon sesame oil
1 pound lean ground beef
3 large cloves garlic, minced
1/4 cup brown sugar
1/3 cup low sodium soy sauce
1 teaspoon minced ginger
1/4 - 1 teaspoon chili garlic sauce (adjust to your spice preference)
salt and pepper
3 scallions, chopped
toasted sesame seeds
Heat the sesame oil in a large skillet over medium-high. Brown the beef until cooked through, about 3 minutes. Toss in the garlic and cook for another minute. Drain off all the fat*.
Stir in the brown sugar, soy sauce, ginger, and chili garlic sauce. Season with salt and pepper. Simmer for 1-2 more minutes to blend the flavors. Toss in the scallions.
Serve over hot rice and sprinkle with a few sesame seeds.
*Quick tip: An easy way to drain off the fat is to use paper towels. Turn off the heat, then move all the beef to one side of the skillet. Tilt the pan the other way so all the oil runs to the other side, away from the beef. Use balled up paper towels to soak up the excess oil. Leave a little oil in the pan (you want some moisture). Then simply throw the paper towels in the trash.
Hiển thị các bài đăng có nhãn beef. Hiển thị tất cả bài đăng
Thứ Sáu, 30 tháng 1, 2015
Thứ Sáu, 22 tháng 8, 2014
Mozzarella Stuffed Meatballs
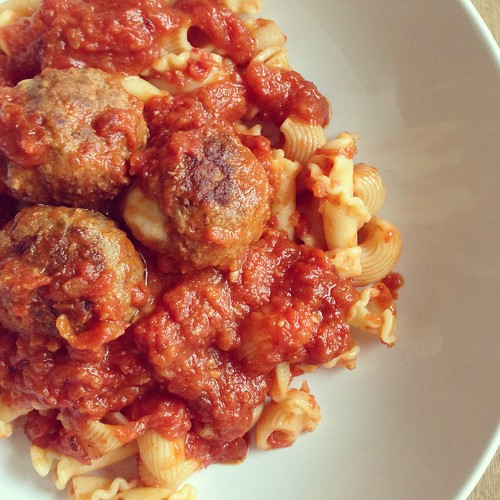
You know a recipe is good when it pushes you out of your blogging slump. These Mozzarella Stuffed Meatballs did just that. I couldn't wait to share them with you guys and I managed to schedule a few more posts while I was at it.
I saw these meatballs on my friend Jaida's blog and she raved about them, so I figured I'd give them a shot. I've been in a cooking rut lately, remaking a lot of old favorites rather than trying new stuff. We've been on a fresh mozzarella kick lately and I knew you couldn't go wrong stuffing it into a meatball. This was an incredibly easy meal to make, perfect for a weeknight. It took less than 10 minutes to make the meatballs and, bonus, I had frozen sauce in the freezer. It took longer to chop the ingredients for the salad I served on the side.
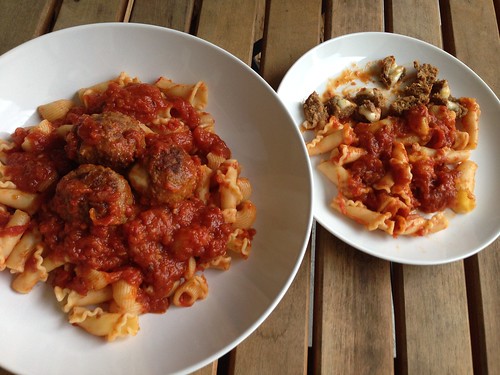
What I didn't expect was for these to be the most flavorful meatballs I've ever made. We were all blown away. Baby Girl said, "these aren't just good, Mommy. They're amazing, awesome and wonderful." It's been awhile since I've photographed dinner outside, so Baby Girl jumped at the chance to have her plate next to mine for a picture.
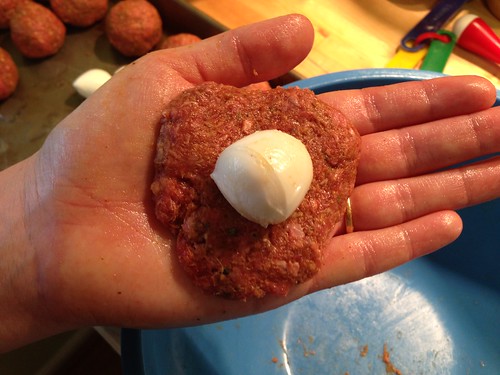
Despite the fact that I thought I'd sealed the meatballs well, most of mine broke open while they cooked. Fortunately, the cheese didn't really melt or leak out. Just make sure you really, really seal them well. I had 14 mozzarella balls, but you may want to stick with the 10-12 in the recipe below so there's more meat to fully encase the cheese.
Mozzarella Stuffed Meatballs
As seen on Sweet Beginnings
1 egg
1/3 cup Italian seasoned bread crumbs
1 lb lean ground beef
1 teaspoon chili powder
1/2 teaspoon paprika
1 teaspoon dried Italian seasoning
1 teaspoon salt
1/2 teaspoon black pepper
1 teaspoon minced garlic
10-12 mini balls fresh mozzarella (bocconcini), or fresh mozzarella cut in small pieces
3 cups pasta sauce
Whisk the egg in a large bowl. Add the bread crumbs, ground beef, chili powder, paprika, Italian seasoning, salt, black pepper, and garlic and mix with your hands until combined.
Divide the meat into 10-12 balls (a couple of tablespoons each). Flatten each section of meat, then wrap it around one mozzarella ball. Squish the edges together to be sure it's sealed. Repeat this process until you've used up all the meat.
Heat a large, non-stick skillet over medium heat (no need to add oil, there's plenty of fat in the meat). Add the meatballs and cook for a couple of minutes on each side, until well-browned.
Add the pasta sauce (enough to coat the bottom and come up about halfway up the meatballs) to the skillet. Simmer for about five minutes, turning the meatballs occasionally to coat them in the sauce.
Serve the meatballs over pasta or rice, as a sandwich, or by themselves.
Thứ Tư, 28 tháng 5, 2014
Crunchy Baked Tacos
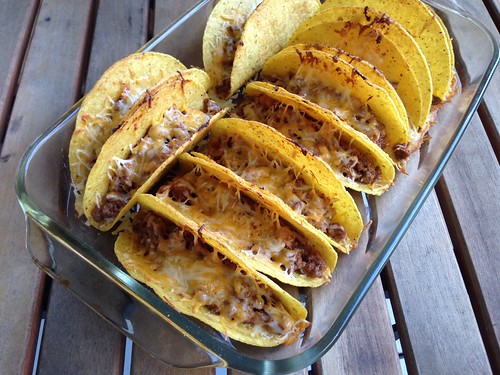
I love tacos but there was always something about them that made me feel like they wouldn't work for a weeknight. I think it was all the prep work for the various toppings, trying not to overfill them at the table and a general dislike of tacos made with soft flour tortillas. Then I saw these Crunchy Baked Tacos from No. 2 Pencil and it was like a light bulb went off in my head. Minimal work and crunchy shells. I was sold.
Baking the shells with the meat and cheese already inside was brilliant - I hate when the cheese isn't fully melted and this solves that problem. Plus, you just take a taco from the baking dish and you're ready to eat. I kept the toppings simple - shredded lettuce, diced grape tomatoes and I found an avocado in my crisper so I diced that up, too. Some sour cream at the table and we were set.
This is definitely my new favorite taco recipe. I swapped out my filling recipe but kept the method the same. The one thing I didn't like - these don't reheat well the next day. In fact, they were downright awful. My recommendation would be to only make as many as you anticipate eating. The good news is they take hardly any time to cook so you can assemble some more and bake them off quickly if you decide you want a second helping.
Crunchy Baked Tacos
Filling from A Taste of Home Cooking, method from No. 2 Pencil
1 5.8 oz box yellow corn taco shells (12 shells)
1 pound ground beef
1 onion, chopped
1 clove minced garlic
2 teaspoons cumin
2 teaspoons chili powder
Salt and pepper
2 tablespoons tomato paste
1/2 cup salsa
1/4 cup sour cream
2 cups of freshly shredded colby jack cheese
romaine lettuce, shredded
vine-ripened tomatoes, diced
sour cream
taco sauce
Preheat oven to 400 degrees and place shells in a 9x13 baking dish.
Heat a saute pan over medium heat. Add the ground beef and cook, breaking up the large chunks, until just starting to brown. Add the onion and garlic and saute until the onions are soft and the beef is cooked through. Add the cumin, chili powder, salt, pepper and tomato paste. Let cook for about 5 minutes. Off heat, add the salsa and sour cream and stir to incorporate.
Sprinkle half of the cheese in the bottom of each taco shell. Evenly distribute the ground beef in each shell. Top ground beef with remaining shredded cheese.
Bake for 8-10 minutes (mine were done at 8 minutes), or until cheese is melted and shells have started to crisp.
Remove from oven and top with lettuce, tomatoes, sour cream and taco sauce.
Thứ Tư, 21 tháng 5, 2014
Recipe Redo: Skillet Beef Stroganoff
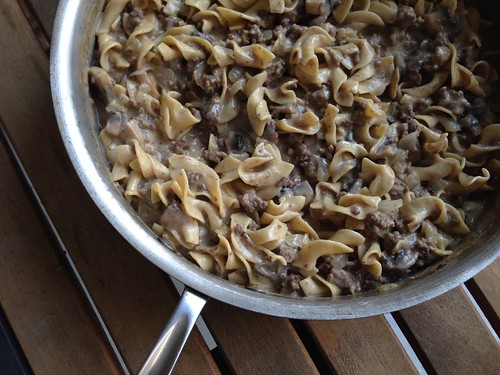
This Skillet Beef Stroganoff has been a family favorite for years but I was never happy with the photo. Whenever I ask SP for meal ideas he usually suggests this one, so I figured it was time to take a new picture.
You've got to love one-pot meals. Cooking the pasta in the sauce adds a silkiness and everything comes together beautifully. This one has really stood the test of time.
Skillet Beef Stroganoff
America's Test Kitchen Easy Skillet Suppers
1 pound ground beef
Salt and pepper
10 ounces white mushrooms, sliced thin
1 onion, chopped fine
2 tablespoons all-purpose flour
1 1/2 cups chicken broth
1 1/2 cups beef broth
1/3 cup brandy
1/3 pound wide egg noodles (3 cups)
2/3 cup sour cream
2 teaspoons lemon juice
Heat a large skillet over medium-high heat. Add the ground beef and cook until it begins to brown. Add the mushrooms, onion, and 1/2 teaspoon salt to the skillet and cook until the liquid from the mushrooms has evaporated, about 8 minutes.
Stir in flour and cook for 30 seconds, then add both broths and the brandy. Bring to a boil, then stir in the noodles. Cook, stirring occasionally, until noodles are tender, 10 to 12 minutes. Remove the skillet from the heat and stir in the sour cream and lemon juice. Season with salt and pepper, to taste.
Thứ Sáu, 4 tháng 4, 2014
Meatball Grilled Cheese Sandwiches
One Sunday SP made spaghetti and meatballs for dinner. The meatball recipe he used yielded quite a bit of leftovers so I froze probably 5 or 6 meatballs for another time. While meal planning one week I decided I wanted to do something different with the meatballs and these meatball grilled cheese sandwiches were born.
I'm partial to good old American cheese but use whatever type of cheese you like. This is really more of a method than a recipe. Use your favorite meatball recipe or even buy some frozen if that's easier. I've added sauteed spinach to these as well and really enjoyed it (plus it makes me feel better to have something healthy thrown in there).
Meatball Grilled Cheese Sandwiches
Makes 4 sandwiches
5-6 meatballs
Butter, for the bread
8 slices bread
Cheese (I like American, use whatever you like)
Extra marinara sauce for dipping
Slice the meatballs into thin discs so they'll lay flat on the bread.
Butter one side of each piece of bread. Flip the bread over so the butter side is down and lay two slices of cheese on each piece of bread. Top four of the slices with some of the sliced meatballs. Add a little extra sauce and then top each with one of the bread and cheese slices, butter side up.
Place the sandwiches on a griddle or large non-stick pan set over medium-low heat. Cook low and slow, allowing the bread to brown evenly and the cheese to start melting before flipping over to cook on the other side. Remove from the heat once both sides of the bread are golden brown and the cheese has melted. Allow to rest for a few minutes before cutting and serving with extra sauce for dipping.
Thứ Tư, 8 tháng 1, 2014
Roast Beef Tenderloin
Every year since my mom met my stepdad we've had the same Christmas dinner. The centerpiece is a Roast Beef Tenderloin. A few years ago I took over Christmas dinner and even though I consider myself to be a good cook, the beef always causes me some stress and anxiety. You don't want to overcook such a high-quality (read: expensive) piece of meat.
I keep the preparation simple to let the flavor of the beef shine through - just some salt and pepper to crust the outside of the beef. This year I also made an au jus to serve with the beef, which was a great addition.
Funny story - since we got a new stove this year I was even more concerned about overcooking the beef. We bought an oven thermometer and discovered our oven runs about 25 degrees hotter than the gauge says. I also bought a new meat thermometer to make doubly sure I cooked the meat as rare as we like it.
After 30 minutes in the oven I realized I had forgotten to compensate with a lower temp, so I quickly turned the oven down. When the roast had been in the oven for an hour I took it out and stuck in the meat thermometer to check it. The screen quickly jumped to 137 degrees in the thickest part. I tested another section and that said 147 degrees. I panicked, convinced I had overcooked the beef. I crossed my fingers and asked SP to stand by me for moral support when I cut into it and, thankfully, it was perfectly cooked. So much for that brand of thermometer!
Roast Beef Tenderloin
1 trimmed and tied beef tenderloin (about 4 lbs)
salt and pepper
Preheat oven to 450 degrees.
Place meat on a rack in a roasting pan. Rub with salt and pepper. Place in the oven, on the center rack for 15 minutes. Reduce the heat to 350 degrees.
Roast the meat for 15 minutes per pound, until desired doneness (120-125 degrees for rare, 130-135 degrees for medium rare). Check the internal temp by inserting a meat thermometer halfway into the thickest part of the meat.
Transfer meat to a platter and let rest for 10-20 minutes before cutting into slices.
Thứ Tư, 20 tháng 11, 2013
Chinese Orange Beef Stir-Fry
I'm a huge fan of Chinese food but with Baby Girl's nut allergy it isn't something we can indulge in often. That's where make-at-home versions of our favorite dishes come into play. While I've never ordered Orange Beef Stir-Fry at a restaurant, Amy's picture was so drool-inducing I couldn't wait to make it.
The flavors in this dish were so bright - the powerful citrus punch, the salty soy sauce and the heat from the chile garlic sauce all came together beautifully. It took all my will power not to eat two servings at dinner that night. And Baby Girl positively loved this, making all kinds of yummy noises and asking for more beef.
The next day I took my leftovers and served it over angel hair pasta, which is my new favorite way of eating Chinese food leftovers.
The best part about this dish is once you get everything prepped (and there really isn't much to prep) the whole dish takes less than 10 minutes to cook. The rice takes longer than that. Such a quick and easy weeknight meal.
Chinese Orange Beef
As seen on Very Culinary, adapted from America’s Test Kitchen
Zest from a small orange
1/2 cup orange juice
1/4 cup brown sugar
2 tablespoons rice vinegar
2 tablespoons soy sauce (low-sodium or gluten free)
2 teaspoons chili garlic sauce
2 teaspoons grated fresh ginger
2 teaspoons cornstarch
2 teaspoons vegetable oil
1 pound fresh green beans, ends cut, trimmed into 2-inch pieces
1 1/2 pounds sirloin, sliced thinly then into 2-inch wide pieces
2 scallions, chopped
In a medium bowl, whisk together the orange zest, orange juice, brown sugar, vinegar, soy sauce, chili garlic sauce, ginger and cornstarch.
In a large nonstick skillet, heat the oil over medium-high heat. Add the green beans and stir for about 4-5 minutes until crisp-tender and brown in some spots. With a slotted spoon, transfer them to a large bowl. Pat the sirloin dry with paper towels; add to the pan, spreading the pieces out in an even layer. Cook, without stirring, for 1 minute. Toss and transfer to the bowl with the green beans.
Whisk the orange juice mixture then add it to the pan. Cook, scraping up any brown bits, until thickened, about 2 minutes. Add sirloin and green beans back to the pan, along with any accumulated juices. Add the scallions; toss to coat.
Serve over rice or pasta.
Thứ Tư, 19 tháng 6, 2013
Recipe Redo - Taco Rice
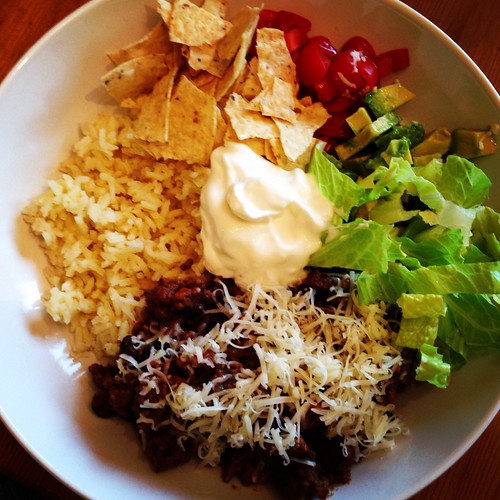
I first made this Taco Rice in January 2012 and felt it needed a bit of work. The original recipe didn't have any sauce and that's a big no-no in this house. I was craving tacos but wanted something slightly different. Time for a recipe redo!
The result: delicious. This was perfect. I had barely finished eating and was already thinking about when I could make it again. The tweaks I made - adding tomato paste, salsa and sour cream to the beef mixture - were just what we wanted. I also decided to add some frozen corn, mainly because I'm on a corn kick lately and thought the little kernels would be nice in the dish. I also added crushed tortilla chips for a bit of crunch and texture and they provided the perfect, salty accompaniment.
Something to note - there's no oil in this dish. I've been saying it a lot lately but my friend Melissa has worked hard to cut oil out of most of her recipes. Ground beef is perfect for this method since the beef has plenty of fat already in it. If you add the onion and garlic to the pan at the same time as the beef they all cook together beautifully (and then there's no need to drain off the fat later). I've loved cutting unnecessary calories from our diet.
UPDATE April 2014 - new picture I posted on Instagram:
Taco Rice
Modified from Cassie Craves
1 onion, chopped
1 clove minced garlic
1 pound ground beef
2 teaspoons cumin
2 teaspoons chili powder
Salt and pepper
2 tablespoons tomato paste
1/2 cup salsa
1/4 cup sour cream,
4 cups steamed rice
Toppings: shredded lettuce, chopped tomatoes, crushed tortilla chips and shredded cheddar
Heat a saute pan over medium heat. Add the onion, garlic and ground beef and saute until the onions are soft and the beef is cooked through, breaking the beef into small chunks as it cooks. Add the cumin, chili powder, salt and pepper and tomato paste. Let this simmer for about 5 minutes. Combine salsa and sour cream and stir into the ground beef.
Spread 1/2 to 1 cup of the steamed rice on each plate. Top with the seasoned beef. Top with shredded lettuce, tomatoes, crushed chips and cheese.
Thứ Tư, 22 tháng 5, 2013
Hamburger Steak with Onion & Mushroom Gravy
With the weather quickly changing from spring to summer I knew I had to take advantage of a cool day to make this Hamburger Steak with Onion & Mushroom Gravy.
This one was right up SP's alley with the mushrooms and mashed potatoes but my stomach is definitely in light summer mode and it seemed too heavy. It was delicious, so I'll definitely make it again in the fall or winter.
Hamburger Steak with Onion & Mushroom Gravy
As seen on Our Best Bites, adapted from Cooking Light
1 pound ground sirloin
kosher salt and freshly ground pepper
1 teaspoon butter
1 large white onion, vertically sliced (about 1 1/2 cups)
1 cup sliced baby portobello mushrooms
4-5 cloves garlic, minced
1 tablespoon all-purpose flour
1 1/2 cups low-sodium beef stock
1 teaspoon red wine vinegar
Divide the meat into 4 1/2″-thick patties. Season both sides with salt and pepper. Set aside.
Heat a large non-stick skillet over medium heat. When the pan is hot, add the patties and cook for 4-5 minutes and then flip and cook for another 4-5 minutes or until cooked through. Remove the patties from the pan and set aside. Drain off any excess fat/grease.
Heat the teaspoon of butter in the skillet. When melted, add the onions and sprinkle lightly with salt and freshly ground pepper. Cook, stirring frequently, until they become tender and start to caramelize, about 5-7 minutes (you may need to add an additional teaspoon of oil if the onions are burning or sticking). Add the mushrooms and garlic and cook until the mushrooms are tender, being careful not to let the garlic burn.
When the onions and mushrooms are cooked, sprinkle them with 1 tablespoon of flour and stir quickly to combine. Add the broth and vinegar and cook until thickened. Add the beef patties and heat through. Serve each patty over mashed potatoes and top with mushrooms, onions, and gravy.
Thứ Tư, 8 tháng 5, 2013
Cheeseburger Macaroni
I've had my friend Melissa's recipe for Cheeseburger Macaroni on my meal plan for more than a month. It just kept getting pushed back, which is a real shame because it was so easy and so delicious. It's basically a Hamburger Helper meal made from scratch.
You'll notice this recipe doesn't include oil. Melissa has practically eliminated all oil/butter from her cooking, using the natural fat in the meat instead. It really is ingenious and the recipes I've tried sans oil are just as flavorful as if I'd started with the requisite 1 tablespoon of oil. The ground beef I buy is 80/20 and by starting with a hot skillet and browning the meat for a few minutes before adding the onions and garlic I was able to render enough fat to cook everything properly without having to drain off any excess later.
This is a simple, hearty one-pot meal the whole family enjoyed. The flavors are so perfect and I love a recipe where you cook the pasta in with the rest of the ingredients. I'm just sorry I waited so long to make it.
Cheeseburger Macaroni
As seen on Alosha’s Kitchen, from Ezra Pound Cake
1 pound ground beef
1 medium onion, diced
2 large cloves garlic, minced
2 1/2 cups beef (or chicken) broth
1 tablespoon yellow mustard
1/2 cup ketchup
1/4 cup tomato paste
1 teaspoon salt
1/2 teaspoon black pepper
8 ounces macaroni
1 cup (4 ounces) cheddar cheese, grated
4 scallions, chopped
Heat a large skillet over medium-high heat. When hot, add the beef, breaking apart the meat, until it starts to brown and render some of its fat. Add the onions and garlic and cook until the onions are soft and the meat cooked through.
Meanwhile, whisk together the broth, mustard, ketchup, tomato paste, salt and pepper. Add to the meat. Bring the mixture to a boil, then add the macaroni.
Reduce the heat to medium, and cover. Continue cooking for 10 to 12 minutes, until the pasta is tender, stirring every few minutes to make sure the pasta doesn't stick.
When the macaroni is done, remove skillet from heat and add the grated cheese, stirring until melted. Top each serving with some of the chopped scallion and serve immediately.
Thứ Tư, 3 tháng 4, 2013
Corned Beef and Cabbage with Herb Buttered Potatoes
You know what I hate - waiting to make a recipe because you have a preconceived notion of how it's going to taste (not good) only to find out you were 100% wrong. And then you kick yourself for not making it sooner and lament all those wasted meal opportunities. That's how I've felt about the meal most people associate with St. Patrick's Day - corned beef and cabbage. I love corned beef, I love cabbage, so why did I think the meal was going to be bland, boring and tasteless?
SP has hinted that he'd like corned beef and cabbage on March 17 for years, but I always balked at it. This year I finally decided to make him happy and asked for recommendations on my cooking board. This Sandra Lee recipe for Corned Beef and Cabbage with Herb Buttered Potatoes came highly recommended and sounded great.
The only real change I made was to the cooking method. I've mentioned before that my slow-cooker and I don't get along, so I opted to make this in my trusty Dutch oven. I cooked it low and slow for 5 hours and when it came time to slice the meat was practically falling apart (in a good way). I snuck a taste off the cutting board for quality control and was floored by the amazing flavor.
Baby Girl asked for a taste of the raw cabbage and enjoyed it, so I was hopeful for the finished product. Result - she loved all of it, the corned beef, the cabbage, the potatoes and the carrots. My only complaint was the small size of the corned beef meant we had just enough for dinner and leftovers for lunch. Next time I'll buy double the size so we have enough for sandwiches.
The meat and vegetables were tender, the cabbage was flavorful and the whole thing (even the buttered potatoes) took next to no effort. I'll definitely be making this again next year - I'm a corned beef and cabbage convert for sure.
Corned Beef and Cabbage with Herb Buttered Potatoes
Slightly modified from Sandra Lee
Corned Beef:
3 pounds corned beef brisket with spice packet (larger if you want more leftovers)
4 carrots, cut into 2-inch pieces
2 medium onions, chopped
1 small head green cabbage, cored, roughly chopped
2 cups apple juice
1 cup water
Potatoes:
2 pounds baby red potatoes, sliced in 1/2
1/2 stick butter, softened
1 tablespoon chopped garlic
2 tablespoons chopped fresh parsley leaves
Salt and freshly ground black pepper
Preheat the oven to 275 degrees.
Put the carrots and onions on the bottom of a large Dutch oven, then put the corned beef on top. Arrange the chopped cabbage around the beef. Add the apple juice and water along with the contents of the spice packet. Cover and place in the oven. Cook 5 hours until the beef is tender. Remove the beef and vegetables to a platter and keep warm.
Add potatoes to a pot of salted water and bring to a boil. Cook until the potatoes are tender, about 12 to 15 minutes. Drain and return them to the pot. Add the butter, garlic, parsley, and salt, and pepper, to taste. Gently combine so that all the potatoes are evenly coated. Transfer to a serving bowl and serve with corn beef and vegetables.
Thứ Hai, 25 tháng 3, 2013
Tex Mex Sloppy Joes
I love sandwiches for easy weeknight meals but I couldn't tell you the last time I had a Sloppy Joe. We didn't eat them growing up so they just aren't on my radar. But I had some ground beef in the freezer, a hankering for guacamole and I'd printed out Tara's recipe for Tex Mex Sloppy Joes awhile back so I decided to give them a try.
Since I'm not a beer drinker I cut the amount of beer down to 6oz from a full 12oz bottle, which was a good call because there was plenty of beer flavor with just those 6oz.
This is a messy but yummy sandwich. A lot of my filling spilled out of the bun with my first bite. Baby Girl's sandwich had a lot less filling so she managed to eat hers without too much trouble.
This was a momentous meal for two reasons, the first being Baby Girl finally likes tomatoes and has rediscovered her love of avocados/guacamole. Avocado was one of her first foods, mashed up and fed to her with a spoon, so when she started turning up her nose at it I was sad. I absolutely love avocados and eat them plain with some salt and lemon juice frequently. I offer her new things or things she's previously disliked every time I make it - my rule is she has to try something but if she doesn't like it she doesn't have to eat it. Tomatoes have been something I've offered countless times over the years and she will dutifully take a bite, spit it back out and say "no thank you, mommy." The night I made these sandwiches I was chopping grape tomatoes for the guacamole and offered her a piece. She chewed, swallowed, asked for more and proceeded to eat most of the tomatoes I'd just finished cutting. And then later, when I'd mixed up the guacamole, she asked for a chip so I told her she needed to try the guac as well. She did, asked for more, and later asked for more with dinner. It was a banner night, I'm telling you.
Tex Mex Sloppy Joes
As seen on Smells Like Home
1 (14.5 oz) can tomato sauce
1 chipotle chile en adobo
2 teaspoons oregano
2 teaspoons ground cumin
1 teaspoon smoked paprika
1/4 teaspoon ground allspice
Pinch of cayenne
2 teaspoons Worcestershire sauce
1 1/4 lbs ground chicken, turkey, or beef
1 teaspoon canola oil
1/2 medium yellow onion, diced
2 cloves garlic, minced
6 oz beer, such as a light ale or lager
2 tablespoons ketchup
1/4 cup cilantro
1 tablespoon lime juice
Salt and black pepper to taste
4 warm hamburger buns
Guacamole
Chopped cilantro, diced onion, grated cheddar or Monterey jack
Add the tomato sauce, chipotle chile (or powder), oregano, ground cumin, smoked paprika, allspice, cayenne and Worcestershire sauce to a blender or food processor and puree until smooth.
Brown the ground meat in a large skillet over medium heat, stirring occasionally until browned, about 10 minutes. Drain off the fat. Warm the canola oil in the pan with the browned meat then add the onions and cook until soft, about 5 minutes. Add the garlic and cook for an additional 30 seconds. Pour the tomato mixture into the skillet along with the beer, ketchup and cilantro. Stir until well combined.
Bring to a low simmer over medium heat then reduce the heat to medium-low heat and cook uncovered for 15 minutes or until the mixture thickens. Stir in the lime juice. Season with salt and pepper to taste. Serve on warm buns with guacamole and other add-ons, if desired.
Thứ Tư, 23 tháng 1, 2013
Beef Stroganoff Meatballs
Every day the ladies on my cooking board post what they're having for dinner. One night Josie mentioned she was making these Beef Stroganoff Meatballs and I was immediately intrigued. We love Swedish Meatballs and Beef Stroganoff, so the idea of combining them sounded great.
These were good but could have been better (at least according to SP). The meatballs were very mildly seasoned and SP said he prefers the Worcestershire sauce in the Swedish meatballs for that added kick. He also has a thing against spaghetti and would have been happier if I served this over egg noodles. I loved the whole dish, especially the dill, but I'll plan to make some modifications before serving it again.
Beef Stroganoff Meatballs
Everyday Food
Coarse salt and pepper
3/4 pound spaghetti
1/2 cup plain dried breadcrumbs
1/2 cup whole milk
3 tablespoons unsalted butter
2 large shallots, diced small
1 pound ground beef chuck (80% lean)
1 pound mushrooms, such as button or cremini, trimmed and sliced 1/2 inch thick
1 cup reduced-fat sour cream
1/4 cup chopped fresh dill, divided
Preheat oven to 500 degrees. In a large pot of boiling salted water, cook pasta according to package instructions. Reserve 2 1/2 cups pasta water; drain.
Meanwhile, in a large bowl, combine breadcrumbs, milk, 3/4 teaspoon salt, and 1/4 teaspoon pepper. In a large heavy pot, melt butter over medium. Add shallots and cook, stirring occasionally, until softened, about 5 minutes. Remove from heat; transfer 1/4 cup shallots to breadcrumb mixture, along with beef and stir until just combined (do not overmix). Form into 1-inch balls and place, 1 inch apart, on a rimmed baking sheet. Bake until browned and cooked through, about 15 minutes, turning halfway through.
Add mushrooms to pot with remaining shallots and cook, stirring, over medium until mushrooms are softened, 5 minutes. Season with salt and pepper. Add reserved pasta water, scraping up browned bits with a wooden spoon, and bring to a rapid simmer. Cook until liquid is reduced by half, about 6 minutes. Remove from heat and stir in sour cream and 2 tablespoons dill. Add meatballs and toss to coat. Divide pasta among four bowls and top with meatballs, sauce, and remaining 2 tablespoons dill.
Thứ Sáu, 11 tháng 1, 2013
Amy's Virtual Baby Shower: Stuffed Shells with Beef and Cheese
Amy over at Amy's Kitchen Creations is having a baby! In fact, her little girl is due any day now. Carrie from Carrie's Sweet Life thought it would be nice to host a virtual baby shower where the theme was simple meals for new moms, with an emphasis on meals that can be made ahead and frozen.
As I was helping SP unpack the groceries the other week I found a box of jumbo pasta shells. I had asked him to buy shells for the Panera mac and cheese I was making but I hadn't specified the size of the shells so he bought the jumbo. I realized I had never made stuffed shells before, so this seemed like a good time to fix that. I had printed out Maeghan's recipe for Stuffed Shells with Beef and Cheese awhile back and couldn't wait to make it.
I didn't know this recipe made so many shells (I admit to not reading all of Maeghan's post), so I was thrilled when I realized I could get two meals out of one afternoon of cooking. I filled all the shells, placed half in the baking dish for that night's dinner and half on a baking sheet to freeze. This is a perfect dish to make for new parents - you can give them a half order to eat now and a frozen, fully-assembled dish for another time.
These were positively delicious. I loved the beef mixed with the cheese, although I was surprised there wasn't any egg in the filling. SP thought the filling was a bit dry because of that but I didn't agree, especially when the shells were smothered in his amazing Sunday Sauce.
I thought stuffed shells would be too much work but this was a really simple recipe to make. The filling takes no time at all to put together. I think shredding the mozzarella cheese took more time than filling the shells. Thanks for a great recipe, Maeghan! And congratulations Amy and Matt!
To see what everyone else made to celebrate Amy and Matt, click here.
Stuffed Shells with Beef and Cheese
As seen on The Way to His Heart
4 teaspoons olive oil
1 medium onion, coarsely chopped
1 lb ground beef
Salt and pepper to taste
1 package of Jumbo Pasta Shells
1 15oz container ricotta cheese
16oz mozzarella cheese, shredded
1 cup Parmesan cheese, grated
2 tablespoons fresh parsley, chopped
2 cloves garlic, minced
2 cups marinara sauce
2 tablespoons butter, cut into pieces
Pre-heat oven to 350 degrees.
Heat skillet over medium heat. Add 1 teaspoon of olive oil, onion, and ground beef. Season with salt and pepper. Saute until meat browns. Remove and let cool.
Brush 1 teaspoon of olive oil over large baking sheet. Cook shells, 4 to 6 minutes, still firm to the bite. Transfer to oiled baking sheet.
Combine ricotta, half the mozzarella, 1/2 cup Parmesan, and parsley. Add garlic, salt, and pepper to taste and mix. Stir cooled meat into cheese mixture.
Brush remaining 2 teaspoons of oil on a 9x13 glass baking dish. Spoon 1 cup of marinara sauce over the bottom of the prepared dish. Fill shells with the cheese and beef mixture. Arrange half the stuffed pasta in a single layer in the prepared dish and spoon remaining sauce over. Place the other half on a separate baking sheet, cover with plastic wrap and freeze. Once frozen, place shells in a freezer bag for future use.
Sprinkle remaining mozzarella, then remaining 1/2 cup Parmesan cheese over pasta. Dot dish with butter slices.
Bake uncovered until sauce bubbles on side of dish, 30 to 35 minutes. Let stand for 5 minutes.
Thứ Hai, 7 tháng 1, 2013
Mexican Pizzas
I can't tell you the last time I ate at Taco Bell (or Taco Hell as the guys I used to work with called the place), but I vividly remember loving their Mexican pizza the one time I tried it. Angie recently posted a make-at-home version of the Mexican Pizzas and I couldn't wait to try them. I've been on such a crazy Mexican kick lately that I find myself adding something Mexican-inspired to every weekly menu.
These didn't disappoint. As always, I prepped everything during the day so all I had to do was assemble and bake. I made my own refried beans - I can never go back to the glop from a can now that I know how easy it is to make them at home - and ended up using smaller tortillas, which worked well because these are quite filling and delicious.
Mexican Pizzas
As seen on My Chicago Kitchen, adapted from Trader Joe's
1 lb. ground beef
1 onion, diced
1 clove garlic, minced
1 tablespoon chili powder
1 teaspoon cumin
1/2 teaspoon smoked paprika
Salt and pepper, to taste
1 recipe refried beans
8 taco size flour tortillas
1 cup chunky salsa, any heat level
2 cups Mexican cheese blend
2-3 green onions, sliced
2 Roma tomatoes, cored and diced
1/4 cup black olives, pitted and sliced
Heat oven to 400 degrees.
In a large skillet over medium heat, brown ground beef. Add onion and saute beef and onion together. Add garlic and saute 2 minutes Season with chili powder, cumin, paprika, salt and pepper, and drain off fat. Set aside.
Line a baking sheet with parchment paper. Place tortillas on baking sheet and bake for 5 minutes. When ready, top 4 tortillas with refried beans, followed by a layer of the beef mixture. Top with remaining four tortillas. Bake for 5-10 minutes.
Spread salsa over the tortillas. Top with cheese, green onions, tomatoes, and olives. Bake for an additional 5-10 minutes, until cheese is melted and begins to bubble. Serve with your favorite toppings.
Thứ Ba, 13 tháng 11, 2012
Beef and Broccoli
I've attempted homemade Chinese food many times and while the dishes are generally pretty tasty they always seem to be lacking something. The photo that accompanied Sally's Beef and Broccoli post had me hooked. Beef and Broccoli was my go-to dish at Chinese restaurants when I was a kid. I would go to a local spot with my grandmother once a week and I always ordered it, usually with extra sauce. It was thick and rich and so, so good I can almost taste it as I'm typing this post.
My sauce wasn't as thick and richly dark as the dish from my childhood, but this was spot-on in terms of flavor. I doubled the sauce recipe below since I love extra sauce and I wish I'd done it when I made the dish - the sauce really made it perfect. I also needed more sauce for the marinade - the original recipe didn't coat all the beef. This is a real winner.
Beef and Broccoli
As seen on Bewitching Kitchen, adapted from Simply Recipes
1 pound flank steak or sirloin, sliced thinly across the grain
1 pound broccoli florets
2 tablespoons grape seed oil
1 yellow bell pepper, seeded, cut in slices
1 clove garlic, very finely minced
1 tablespoon cornstarch, dissolved in 2 tablespoons water
For the beef marinade
1 tablespoon soy sauce
1 tablespoon Chinese rice wine (or dry sherry)
1 tablespoon cornstarch
Freshly ground black pepper
For the sauce
4 tablespoons oyster sauce
1 tablespoon Chinese rice wine (or dry sherry)
2 tablespoons soy sauce
1/2 cup chicken broth (or water)
Start by marinating the beef: mix all ingredients in a bowl, add the pieces of beef and stir to coat the slices. Let it stand for 10 minutes, while you prepare the sauce and blanch the broccoli.
Make the sauce by mixing the oyster sauce, rice wine (or sherry), soy sauce, and chicken stock (or water) in a small bowl. Reserve. Place the broccoli in boiling salted water for 2 minutes. Drain very well and reserve.
Heat a large frying pan or wok over high heat until a bead of water sizzles and instantly evaporates upon contact. Add the cooking oil and swirl to coat. Add the yellow bell pepper and cook it for a couple of minutes, stirring constantly, until it begins to soften. Remove and reserve. Make sure the pan is again very hot, and add the slices of beef, spreading them out all over the surface of the wok or pan in a single layer (preferably not touching). Let the beef fry undisturbed for 1 minute. Flip the beef slices over, add the garlic and reserved bell pepper to the pan and fry for an additional 30 seconds to 1 minute until the beef is cooked through.
Pour in the sauce, add the blanched broccoli and bring to a boil. Pour in the dissolved cornstarch and cook, stirring, until the sauce boils and thickens, 30 seconds. Serve over rice.
Thứ Tư, 31 tháng 10, 2012
Roast Beef & Cheddar Panini
I'm always looking for quick sandwiches to make for dinner on Tuesday nights. I get home late from my exercise class and it's nice to just throw together a quick sandwich that I prepped earlier. These Roast Beef & Cheddar Panini might not sound special but holy yum were they good.
Like Kate said in her blog post, the chipotle mayo and caramelized onions elevate this from an ordinary sandwich to something extraordinary. Make sure you use a nice, sharp cheddar so the flavor doesn't get lost in the shuffle. I actually brought out my Griddler to make these and I'm glad I did - the crispy bread really adds the finishing touch to these sandwiches. If you're looking for something a little different give these a try.
Roast Beef & Cheddar Panini
As seen on Kate's Recipe Box, originally from Williams Sonoma
Makes 4 sandwiches
1 tablespoon olive oil
2 large yellow onions, thinly sliced
1 1/2 teaspoons chipotle sauce
1/3 cup mayonnaise
Cooking spray
8 slices country-style bread
Sliced cheddar cheese, to taste
3/4 lb thin slices roast beef
In a large skillet over medium heat, warm the olive oil. Add the onions, cover and cook, stirring occasionally, until they are completely limp, 10 to 15 minutes. Uncover the pan, reduce the heat to medium-low and cook, stirring frequently, until the onions are golden brown and sweet, 35 to 45 minutes; do not allow them to burn. Remove the pan from the heat and let the onions cool to room temperature.
Preheat an electric panini maker according to the manufacturer’s instructions. Stir chipotle sauce into mayonnaise.
Spray one side of each bread slice with cooking spray. Lay the slices, oiled side down, on a clean work surface. Spread the top of each slice with some of the mayonnaise mixture. Add slices of cheese. Divide the roast beef into four even amounts and place the slices on four pieces of the bread. Evenly divide the caramelized onions and top the roast beef with the onions. Top with the other bread slice, oiled side up.
Place each sandwich on the preheated panini maker and cook according to the manufacturer’s instructions until the bread is golden and the cheese is melted, 3 to 5 minutes. Transfer the sandwich to a cutting board and cut in half. Serve immediately.
Thứ Sáu, 26 tháng 10, 2012
Traditional Chili
To many people fall means chili. I have a go-to recipe I use whenever SP asks me to make chili, but I saw this Traditional Chili over at Southern Pink Lemonade and figured I'd give it a try.
This was an incredibly easy recipe - brown the beef, onions and garlic, add in the rest of the ingredients and leave it alone for a few hours. My chili was a little thick, so I had to add in some water as it was cooking. I modified the recipe to add in some water and cut the beer in half - a full bottle was a little too overpowering.
Full disclosure - I'm not a big fan of chili. I made this because SP loves it and so I'd have leftovers for the freezer. I've got big plans to make chili cheese fries sometime this fall.
Traditional Chili
Adapted by Peace, Love, and French Fries, as seen on Southern Pink Lemonade
1 1/2 - 2 pounds ground beef
1 large onion, finely diced
3-4 cloves garlic, minced
2- 15 ounce cans red kidney beans, drained and rinsed (you could also use black beans or pinto beans)
24 ounces tomato sauce
6 ounce bottle of beer
8 ounces water
6 ounce can tomato paste
4 1/5 ounce can diced green chilies
2 tablespoons chili powder
1 tablespoon Worcestershire sauce
1 tablespoon cumin
1-2 teaspoons cayenne pepper, depending on how spicy you would like your chili
1 teaspoon paprika
1-2 teaspoons hot sauce, depending on how spicy you would like your chili
In a large soup pot or dutch oven, brown ground beef with onion and garlic over medium-high heat. Drain beef of excess grease, if necessary. Add the remaining ingredients to the pot. Bring to a boil and then reduce heat to medium-low. Allow chili to simmer for 3 hours or until thickened. Stir occasionally.
Top with shredded cheese, green onions, or sour cream, if you would like. You can also serve chili over rice, fries, or even top your hotdog with it.
Thứ Tư, 12 tháng 9, 2012
One-Pot Creamy Taco Mac
The night I made this for dinner the original plan had been to make Swedish Meatballs with Egg Noodles. But that morning I just couldn't stand the thought of rolling out all the meatballs, not to mention I wasn't in the mood for those flavors. At all. I asked the ladies on my cooking board for inspiration and Creamy Taco Mac way, which I made back in 2010, was mentioned. While we enjoyed it, I haven't made it since, but I remembered that Elly had turned it into a One-Pot Creamy Taco Mac, cooking the pasta with the rest of the ingredients they way I do for my Skillet Beef Stroganoff. Perfect.
Since I had half a large zucchini in the fridge I decided to sub that for the green pepper. Since I didn't have cream cheese I simply left it out and I didn't miss it. The starch from the pasta acted as a binder and brought the whole dish together, especially since I let it sit for about 10 minutes before serving so it could cool slightly. I added sliced scallions as a garnish for some bright onion flavor and I also left the tomatoes with their juice instead of draining them. For a meal that I decided to make only a few hours before dinnertime, this came together surprisingly well.
Creamy Taco Mac
Slightly adapted from Elly Says Opa!
1 lb. ground beef or sirloin
1 onion, diced
1 small zucchini, diced
1 (14.5 oz.) can diced tomatoes
3 to 3 1/4 cups low-sodium beef broth
4 tablespoons taco seasoning (recipe below, or use a low-sodium store-bought mix)
8 oz. small pasta shapes, like elbows or small shells
1/2 cup sour cream (low fat is fine)
Shredded cheddar
2-3 scallions, sliced (garnish)
Heat a Dutch oven over medium heat. Add the ground beef. Do not stir. Once browned on the bottom, flip the beef, breaking it up, and stir in the onion and zucchini. Cook until onion is translucent and beef is browned. (Drain fat, if necessary.)
Stir in the undrained diced tomatoes, broth, and taco seasoning. Season to taste with salt and pepper and bring to a boil. Stir in the pasta. Cover, reduce heat to low and cook, stirring occasionally, until the pasta is tender, about 10 minutes.
Off the heat, add the sour cream and cheddar. Re-season to taste, if necessary. Garnish with sliced scallions.
Taco Seasoning
2 tablespoons mild chili powder
1 tablespoons cumin
1/2 teaspoon garlic powder
1/4 teaspoon cayenne pepper
1/2 teaspoon onion powder
1/2 teaspoon oregano
3/4 teaspoon paprika
Mix all the spices together. This makes enough seasoning for the 4 tablespoons needed in this recipe.
Thứ Ba, 3 tháng 7, 2012
Beef and Bean Burritos
I'm really getting into beans lately. They're so good for you and versatile to boot. I really need to start keeping a few cans in the pantry for those nights when I don't know what to make for dinner. I remember one of my favorite meals when I studied abroad in England was pasta with tomatoes, red or green bell pepper, onions, garlic and a can of red kidney beans. I cooked all the veggies in olive oil and the oil made a nice sauce for the pasta. It was delicious.
But, I digress. This post is about these Spicy Beef and Bean Burritos, which Jill thoughtfully posted on the day I was planning to make Beef Tostados only to realize the night before that I'd used up all the bacon. Can't make homemade refried beans without bacon (well, you probably could but why would you want to?) And thus these burritos were born.
I omitted the can of black beans from the original recipe, subbing in one pound of ground beef since I'd already defrosted it for the tostados. I also left out the chipotle pepper since I wanted Baby Girl to eat it and swapped the cucumber for avocado since I had one in the fridge that needed to be used up. This recipe makes a ton of filling, so I ended up freezing about half of it. That will come in nice and handy when I need another fast dinner. I made a quesadilla with the leftover filling for lunch the next day that was positively lip-smacking. Unfortunately my tortillas were fajita-size so the burrito I attempted to photograph wasn't really big enough to cut in half, but it was still delicious.
Thanks for saving the day, Jill!
Spicy Beef and Bean Burritos
Modified from Annie’s Eats, as seen on JBean Cuisine
2 teaspoons olive oil
1 small onion, diced
1 lb ground beef
2 cloves garlic, grated or minced
1 teaspoon chili powder
1 teaspoon minced chipotle in adobo sauce (I omitted)
1 teaspoon ground cumin
1 small pinch of cayenne pepper
1 (15 oz.) can black beans, drained and rinsed
1/3 cup water, vegetable broth or chicken broth
Salt and pepper to taste
6 tablespoons of your favorite store-bought salsa
For serving:
6 (9- or 10-inch) flour tortillas, warmed
Shredded cheddar cheese
Diced cherry tomatoes
Shredded romaine lettuce
Diced red onion
Diced avocado
Low-fat sour cream or Greek yogurt
Diced cilantro
Heat the oil in a skillet over medium-high heat. Add the onion and sauté until translucent and slightly brown. Add the beef and cook until no longer pink. Drain off any fat. Add the garlic, chili powder, chipotle, cumin, salt and cayenne; stir, cooking just until fragrant, 30-60 seconds. Add the beans and the water or broth to the skillet. Season with salt and pepper. Bring the mixture to a boil. Reduce the heat to medium-low and allow the mixture to simmer for 10 minutes. Remove the skillet from the heat and stir in the salsa.
Spoon about a third of a cup of the bean mixture down the center of each tortilla. Top each serving with a pinch of shredded cheese, tomatoes, lettuce, onion, avocado, cilantro and sour cream. Roll the tortilla up tightly, burrito style, and serve immediately.
Đăng ký:
Bài đăng (Atom)