I love this time of year. Now that the weather is getting warmer I'm gearing up for the influx of fresh fruits and veggies, especially asparagus. I absolutely love asparagus and while we do buy them throughout the year they're always best (and cheapest) in season, of course.
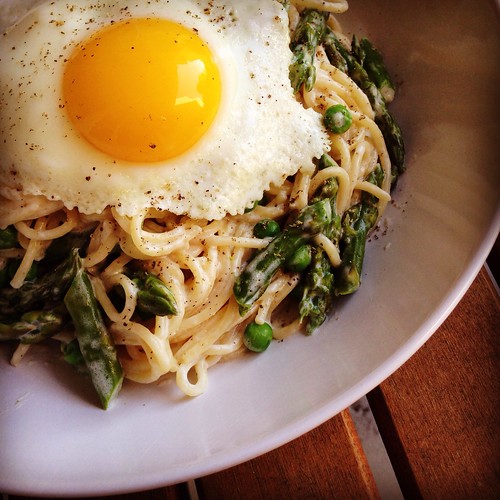
Paula recently posted this gorgeous Spring Linguine with Alfredo, Poached Egg and Asparagus. Adding poached eggs to a pasta dish is pure genius, especially pasta that involves asparagus - because we all know eggs and asparagus are a match made in heaven.
I was worried my bunch of asparagus wouldn't stretch to a full pound of pasta so I added in another springtime favorite - peas. Asparagus and peas also go well together and they were a great addition to the dish.
I was skeptical of poaching the eggs in advance and reheating them, worried the yolk would overcook, but I was proved wrong. What a great idea, especially for brunch parties. Being able to make a bunch of poached eggs in advance and then reheat right before serving is brilliant. This is a delicious spring dish I can't wait to remake during asparagus season.
Linguine with Alfredo, Asparagus, Peas and Poached Egg
Slightly modified from The Saucy Southerner
1lb linguine or spaghetti
1 bunch asparagus, cut into 1-inch pieces
1 cup frozen peas
4 tablespoons butter
1 1/2 cups half & half
salt and ground black pepper, to taste
1/2 cup Parmesan cheese, grated (this is about an ounce)
4 large eggs, poached to desired doneness
In a large pot of boiling salted water, cook pasta according to package directions. In the last two minutes add the asparagus to the pasta water to cook. Drain pasta, reserving 1 cup of the pasta cooking water. Add pasta back to the pot and stir in the peas.
While the pasta is cooking, melt the butter in a pot, then add the cream, salt and pepper. Allow to thicken slightly, then turn off the heat and add the Parmesan cheese. Add the sauce to the pasta and vegetables and toss to coat. Thin with some of the pasta cooking water, if necessary.
Remove the pasta to plates, creating a nest in the center for the eggs. Reheat poached eggs for 15 seconds in hot (but not boiling) water and remove with a slotted spoon to the top of the pasta. Garnish with more Parmesan cheese and freshly ground black pepper.
Thứ Hai, 15 tháng 4, 2013
Thứ Sáu, 12 tháng 4, 2013
Recipe Swap: Chicken Suiza Pockets
Chicken was the theme for the latest recipe swap. It's such a versatile meat but like most people I get into a rut making the same chicken dishes over and over again. I was excited when I was assigned these Chicken Suiza Pockets from Jenna. We love Mexican food and these seemed simple yet different from anything I've made before.
I didn't read the recipe ahead of time so I didn't realize it called for mixing the chicken and other ingredients in a stand mixer to shred the chicken. While I really want to try this tip, I didn't feel like dragging my stand mixer out of the garage when I could just shred the chicken by hand and mix it with the other ingredients.
I ended up cooking the chicken and mixing up the filling a few days before I made this recipe due to a change in dinner plans. The next day I needed a quick lunch so I snagged some of the filling and made a quesadilla. It was good so I was really looking forward to dinner the next night.
Unfortunately I had some issues getting my crescent rolls to stick together. The perforated lines didn't want to cooperate and I only managed to get three pockets made, which was fine because that fed us all for dinner. Baby Girl was a big fan, eating half a pocket in addition to the salad I served on the side. These were good and I liked the concept but I think a different rolled dough would make it easier.
Chicken Suiza Pockets
As seen on Jenna’s Cooking Journey, originally from Cassie Craves
2 small chicken breasts
1 can Rotel (diced tomatoes with green chiles)
5 ounces cream cheese, softened
1/2 cup salsa verde
1 tablespoons honey
Juice of 1 lemon
1/2 teaspoon cumin
Salt and pepper to taste
1/2 cup shredded Mexican Blend cheese
2 packages crescent rolls
Cilantro, chopped
Preheat the oven to 375.
Put chicken breasts and Rotel in a glass baking dish and bake until the chicken is done, about 35 minutes.
Place the chicken breasts, 3 tablespoons of the Rotel and all the other ingredients except the crescent rolls and the cilantro into a standing mixer. Turn on low and mix until all the ingredients are combined (this will shred your chicken and combine all the ingredients). Alternatively, you can shred the chicken and mix with the other ingredients in a large bowl.
Divide each pack of crescent rolls into 4 rectangles by sealing together two triangles of dough. Divide the filling evenly among the 8 rectangles. Seal by pinching the dough up and into the middle. Bake 20 minutes.
Top with cilantro, if desired.
I didn't read the recipe ahead of time so I didn't realize it called for mixing the chicken and other ingredients in a stand mixer to shred the chicken. While I really want to try this tip, I didn't feel like dragging my stand mixer out of the garage when I could just shred the chicken by hand and mix it with the other ingredients.
I ended up cooking the chicken and mixing up the filling a few days before I made this recipe due to a change in dinner plans. The next day I needed a quick lunch so I snagged some of the filling and made a quesadilla. It was good so I was really looking forward to dinner the next night.
Unfortunately I had some issues getting my crescent rolls to stick together. The perforated lines didn't want to cooperate and I only managed to get three pockets made, which was fine because that fed us all for dinner. Baby Girl was a big fan, eating half a pocket in addition to the salad I served on the side. These were good and I liked the concept but I think a different rolled dough would make it easier.
Chicken Suiza Pockets
As seen on Jenna’s Cooking Journey, originally from Cassie Craves
2 small chicken breasts
1 can Rotel (diced tomatoes with green chiles)
5 ounces cream cheese, softened
1/2 cup salsa verde
1 tablespoons honey
Juice of 1 lemon
1/2 teaspoon cumin
Salt and pepper to taste
1/2 cup shredded Mexican Blend cheese
2 packages crescent rolls
Cilantro, chopped
Preheat the oven to 375.
Put chicken breasts and Rotel in a glass baking dish and bake until the chicken is done, about 35 minutes.
Place the chicken breasts, 3 tablespoons of the Rotel and all the other ingredients except the crescent rolls and the cilantro into a standing mixer. Turn on low and mix until all the ingredients are combined (this will shred your chicken and combine all the ingredients). Alternatively, you can shred the chicken and mix with the other ingredients in a large bowl.
Divide each pack of crescent rolls into 4 rectangles by sealing together two triangles of dough. Divide the filling evenly among the 8 rectangles. Seal by pinching the dough up and into the middle. Bake 20 minutes.
Top with cilantro, if desired.
Thứ Tư, 10 tháng 4, 2013
Macaroni and Cheese with Bacon and Peas
I mentioned that I made two recipes from Katie's blog for the recent Blogger's Choice swap. This is the second, a version of the Panera mac and cheese I've made countless times - Macaroni and Cheese with Bacon and Peas. I think Katie is brilliant for adding bacon and peas to this recipe, two things my whole family loves and I always have on hand. This was the perfect recipe to make one weeknight when my planned meal went awry due to woody, thick, overpriced asparagus at the supermarket.
Once again Baby Girl impressed me with her eating, asking for multiple pieces of cooked bacon and snacking on frozen peas. Bacon was something she's tried before and kept claiming she didn't like. I guess she finally changed her mind. The frozen pea thing perplexes me - the kid loves eating things straight from the freezer.
I haven't been able to find pipette pasta in the store before (that's the shape Panera uses) but I was at a different grocery store recently, saw it in the pasta aisle and grabbed a box to keep on hand. I was so excited to finally use it. It holds the sauce so well and the opening was the perfect size for the peas to hide.
This is a fantastic version of one my favorite stovetop macaroni and cheese with the added bonus of a veggie built right in. And everything is better with bacon.
Macaroni and Cheese with Bacon and Peas
As seen on So Tasty, So Yummy
1 pound small pasta (shells, elbows, pipette)
4 slices bacon
1/3 cup flour
2 1/2 cups whole milk
4 ounces white American cheese, chopped or torn into pieces
8 ounces extra sharp white Vermont cheddar, chopped or torn into pieces
2 teaspoons Dijon mustard
1 teaspoon Kosher salt
1/4 teaspoon hot sauce
1 1/2 cups frozen peas
Cook pasta according to package directions. Drain well. Return to the pot.
While the pasta cooks, cook the bacon in a medium-size pot. Drain the bacon on paper towels and crumble. Leave four tablespoons of the bacon grease in the pot and whisk in the flour; cook for 1 1/2 minutes whisking constantly. Gradually whisk in the milk until no lumps remain. Reduce the heat to medium-low and cook milk mixture, whisking frequently, until it thickens and bubbles, about 8 minutes.
Remove pan from the heat and by the handful, stir in the cheeses allowing all of the cheese to melt into the sauce before adding more. Stir in the mustard, salt, and hot sauce. Stir peas and bacon into the pot with the pasta, then add the cheese sauce. Be sure to stir up the sauce from the bottom of the sauce pan and thoroughly coat all of the pasta with sauce. Serve immediately.
Once again Baby Girl impressed me with her eating, asking for multiple pieces of cooked bacon and snacking on frozen peas. Bacon was something she's tried before and kept claiming she didn't like. I guess she finally changed her mind. The frozen pea thing perplexes me - the kid loves eating things straight from the freezer.
I haven't been able to find pipette pasta in the store before (that's the shape Panera uses) but I was at a different grocery store recently, saw it in the pasta aisle and grabbed a box to keep on hand. I was so excited to finally use it. It holds the sauce so well and the opening was the perfect size for the peas to hide.
This is a fantastic version of one my favorite stovetop macaroni and cheese with the added bonus of a veggie built right in. And everything is better with bacon.
Macaroni and Cheese with Bacon and Peas
As seen on So Tasty, So Yummy
1 pound small pasta (shells, elbows, pipette)
4 slices bacon
1/3 cup flour
2 1/2 cups whole milk
4 ounces white American cheese, chopped or torn into pieces
8 ounces extra sharp white Vermont cheddar, chopped or torn into pieces
2 teaspoons Dijon mustard
1 teaspoon Kosher salt
1/4 teaspoon hot sauce
1 1/2 cups frozen peas
Cook pasta according to package directions. Drain well. Return to the pot.
While the pasta cooks, cook the bacon in a medium-size pot. Drain the bacon on paper towels and crumble. Leave four tablespoons of the bacon grease in the pot and whisk in the flour; cook for 1 1/2 minutes whisking constantly. Gradually whisk in the milk until no lumps remain. Reduce the heat to medium-low and cook milk mixture, whisking frequently, until it thickens and bubbles, about 8 minutes.
Remove pan from the heat and by the handful, stir in the cheeses allowing all of the cheese to melt into the sauce before adding more. Stir in the mustard, salt, and hot sauce. Stir peas and bacon into the pot with the pasta, then add the cheese sauce. Be sure to stir up the sauce from the bottom of the sauce pan and thoroughly coat all of the pasta with sauce. Serve immediately.
Thứ Hai, 8 tháng 4, 2013
California Club Blue Cheese Chopped Salad
Lately I've been craving salad, not a simple side salad with a few veggies but a hearty dinner salad. I've been wanting to make a chopped salad where all the ingredients are cut to uniform size and this California Club Blue Cheese Chopped Salad sounded perfect.
What a great salad. The dressing is so simple but deliciously tangy and I loved the combination of ingredients. I knew SP wouldn't be satisfied with just the veggies and beans so I bulked it up with a roasted chicken breast and frozen corn, my new favorite salad addition. I love the pop of the kernels when I bite into them.
Baby Girl helped me cut up all the ingredients and ended up snacking on everything. I was worried about her spoiling her dinner but how do you say no when your child wants to eat veggies (answer - you don't). I was anxious to see if she would eat the salad once it was assembled and dressed and get this, she did! I gave her a big girl bowl (read: a ceramic bowl rather than her plastic ones) and she chowed down. I was so proud.
California Club Blue Cheese Chop Salad
Modified from Lauren's Latest
Salad:
2 large romaine hearts, washed and thinly sliced
1/2 pint grape tomatoes, quartered
6 slices bacon, cooked and crumbled
1 chicken breast, roasted* and cubed
1/4 cup blue cheese crumbles
1 ripe avocado, diced
1/2 cup rinsed and drained black beans
1 cup frozen corn
Dressing:
2 cloves garlic, minced
Juice of 1 large lemon, about 3 tablespoons
2/3 cup mayonnaise
Salt & pepper, to taste
Toss all ingredients for salad together and set aside.
For dressing, whisk all ingredients together and toss with salad. Serve immediately.
*Preheat the oven to 375 degrees. Spread a piece of aluminum foil across a baking sheet, and arrange chicken breasts in a single layer in the center. Sprinkle with salt and pepper. Fold the aluminum foil over the chicken breasts, and enclose them to form a "packet." Bake the chicken (on the baking sheet) 35-45 minutes, or until it is cooked through.
What a great salad. The dressing is so simple but deliciously tangy and I loved the combination of ingredients. I knew SP wouldn't be satisfied with just the veggies and beans so I bulked it up with a roasted chicken breast and frozen corn, my new favorite salad addition. I love the pop of the kernels when I bite into them.
Baby Girl helped me cut up all the ingredients and ended up snacking on everything. I was worried about her spoiling her dinner but how do you say no when your child wants to eat veggies (answer - you don't). I was anxious to see if she would eat the salad once it was assembled and dressed and get this, she did! I gave her a big girl bowl (read: a ceramic bowl rather than her plastic ones) and she chowed down. I was so proud.
California Club Blue Cheese Chop Salad
Modified from Lauren's Latest
Salad:
2 large romaine hearts, washed and thinly sliced
1/2 pint grape tomatoes, quartered
6 slices bacon, cooked and crumbled
1 chicken breast, roasted* and cubed
1/4 cup blue cheese crumbles
1 ripe avocado, diced
1/2 cup rinsed and drained black beans
1 cup frozen corn
Dressing:
2 cloves garlic, minced
Juice of 1 large lemon, about 3 tablespoons
2/3 cup mayonnaise
Salt & pepper, to taste
Toss all ingredients for salad together and set aside.
For dressing, whisk all ingredients together and toss with salad. Serve immediately.
*Preheat the oven to 375 degrees. Spread a piece of aluminum foil across a baking sheet, and arrange chicken breasts in a single layer in the center. Sprinkle with salt and pepper. Fold the aluminum foil over the chicken breasts, and enclose them to form a "packet." Bake the chicken (on the baking sheet) 35-45 minutes, or until it is cooked through.
Thứ Sáu, 5 tháng 4, 2013
The Ultimate Stuffed Potato
The other day I caught an episode of Tyler's Ultimate and he was making The Ultimate Stuffed Potato, basically a baked potato topped with a cheese sauce mixed with bacon and broccoli. I was practically drooling watching him assemble these potatoes (which were a side dish to a steak dinner, if you can believe it). I figured the potato alone was filling enough for dinner.
I made some modifications to the cheese sauce after seeing that it called for 1/2 stick of butter and only 1/2 cup of milk. I dropped the butter and flour to 2 tablespoons each and upped the milk to 1 cup to make a thinner sauce. I had to add a few splashes of milk to thin it when we were ready to eat since I made it ahead of time, so use your judgement. I also ended up mixing together the ends of a few different cheeses because I only had about 1 ounce of cheddar left in the fridge. American and a little Pecorino mixed in well and the resulting sauce was drinkably good.
I loved these potatoes and, once again, Baby Girl was stealing pieces of broccoli, bacon and cheese as we were cooking dinner. I baked her a tiny potato and she was a big fan. These are so, so good.
The Ultimate Stuffed Potato
Tyler Florence
4 large Idaho potatoes, scrubbed
Extra-virgin olive oil
Kosher salt
2 tablespoons butter
2 tablespoons flour
1 cup milk
About 1-2 cups shredded sharp white Cheddar
2 broccoli crowns cut into florets, blanched in salty water
1/2 pound bacon, medium dice, cooked until crisp
2 tablespoons chives, chopped (optional)
Freshly ground black pepper
Preheat oven to 400 degrees F.
Place potatoes onto a baking sheet. Pierce with a fork, drizzle with olive oil and season with salt. Place into preheated oven and bake for about 1 hour.
Melt the butter over medium heat and then whisking in the flour. Cook for 1 minute then add the milk. Allow to boil for 5 minutes, then off heat fold in the cheese and stir until melted. Once melted, add the cooked broccoli and bacon. Season with salt and freshly ground black pepper.
When the potatoes are done make a cut across the top and squeeze it from the bottom so a small pouch opens up and the bottom is squared off. Spoon the filling over the top of the potato and season with pepper, to taste.
I made some modifications to the cheese sauce after seeing that it called for 1/2 stick of butter and only 1/2 cup of milk. I dropped the butter and flour to 2 tablespoons each and upped the milk to 1 cup to make a thinner sauce. I had to add a few splashes of milk to thin it when we were ready to eat since I made it ahead of time, so use your judgement. I also ended up mixing together the ends of a few different cheeses because I only had about 1 ounce of cheddar left in the fridge. American and a little Pecorino mixed in well and the resulting sauce was drinkably good.
I loved these potatoes and, once again, Baby Girl was stealing pieces of broccoli, bacon and cheese as we were cooking dinner. I baked her a tiny potato and she was a big fan. These are so, so good.
The Ultimate Stuffed Potato
Tyler Florence
4 large Idaho potatoes, scrubbed
Extra-virgin olive oil
Kosher salt
2 tablespoons butter
2 tablespoons flour
1 cup milk
About 1-2 cups shredded sharp white Cheddar
2 broccoli crowns cut into florets, blanched in salty water
1/2 pound bacon, medium dice, cooked until crisp
2 tablespoons chives, chopped (optional)
Freshly ground black pepper
Preheat oven to 400 degrees F.
Place potatoes onto a baking sheet. Pierce with a fork, drizzle with olive oil and season with salt. Place into preheated oven and bake for about 1 hour.
Melt the butter over medium heat and then whisking in the flour. Cook for 1 minute then add the milk. Allow to boil for 5 minutes, then off heat fold in the cheese and stir until melted. Once melted, add the cooked broccoli and bacon. Season with salt and freshly ground black pepper.
When the potatoes are done make a cut across the top and squeeze it from the bottom so a small pouch opens up and the bottom is squared off. Spoon the filling over the top of the potato and season with pepper, to taste.
Thứ Tư, 3 tháng 4, 2013
Corned Beef and Cabbage with Herb Buttered Potatoes
You know what I hate - waiting to make a recipe because you have a preconceived notion of how it's going to taste (not good) only to find out you were 100% wrong. And then you kick yourself for not making it sooner and lament all those wasted meal opportunities. That's how I've felt about the meal most people associate with St. Patrick's Day - corned beef and cabbage. I love corned beef, I love cabbage, so why did I think the meal was going to be bland, boring and tasteless?
SP has hinted that he'd like corned beef and cabbage on March 17 for years, but I always balked at it. This year I finally decided to make him happy and asked for recommendations on my cooking board. This Sandra Lee recipe for Corned Beef and Cabbage with Herb Buttered Potatoes came highly recommended and sounded great.
The only real change I made was to the cooking method. I've mentioned before that my slow-cooker and I don't get along, so I opted to make this in my trusty Dutch oven. I cooked it low and slow for 5 hours and when it came time to slice the meat was practically falling apart (in a good way). I snuck a taste off the cutting board for quality control and was floored by the amazing flavor.
Baby Girl asked for a taste of the raw cabbage and enjoyed it, so I was hopeful for the finished product. Result - she loved all of it, the corned beef, the cabbage, the potatoes and the carrots. My only complaint was the small size of the corned beef meant we had just enough for dinner and leftovers for lunch. Next time I'll buy double the size so we have enough for sandwiches.
The meat and vegetables were tender, the cabbage was flavorful and the whole thing (even the buttered potatoes) took next to no effort. I'll definitely be making this again next year - I'm a corned beef and cabbage convert for sure.
Corned Beef and Cabbage with Herb Buttered Potatoes
Slightly modified from Sandra Lee
Corned Beef:
3 pounds corned beef brisket with spice packet (larger if you want more leftovers)
4 carrots, cut into 2-inch pieces
2 medium onions, chopped
1 small head green cabbage, cored, roughly chopped
2 cups apple juice
1 cup water
Potatoes:
2 pounds baby red potatoes, sliced in 1/2
1/2 stick butter, softened
1 tablespoon chopped garlic
2 tablespoons chopped fresh parsley leaves
Salt and freshly ground black pepper
Preheat the oven to 275 degrees.
Put the carrots and onions on the bottom of a large Dutch oven, then put the corned beef on top. Arrange the chopped cabbage around the beef. Add the apple juice and water along with the contents of the spice packet. Cover and place in the oven. Cook 5 hours until the beef is tender. Remove the beef and vegetables to a platter and keep warm.
Add potatoes to a pot of salted water and bring to a boil. Cook until the potatoes are tender, about 12 to 15 minutes. Drain and return them to the pot. Add the butter, garlic, parsley, and salt, and pepper, to taste. Gently combine so that all the potatoes are evenly coated. Transfer to a serving bowl and serve with corn beef and vegetables.
SP has hinted that he'd like corned beef and cabbage on March 17 for years, but I always balked at it. This year I finally decided to make him happy and asked for recommendations on my cooking board. This Sandra Lee recipe for Corned Beef and Cabbage with Herb Buttered Potatoes came highly recommended and sounded great.
The only real change I made was to the cooking method. I've mentioned before that my slow-cooker and I don't get along, so I opted to make this in my trusty Dutch oven. I cooked it low and slow for 5 hours and when it came time to slice the meat was practically falling apart (in a good way). I snuck a taste off the cutting board for quality control and was floored by the amazing flavor.
Baby Girl asked for a taste of the raw cabbage and enjoyed it, so I was hopeful for the finished product. Result - she loved all of it, the corned beef, the cabbage, the potatoes and the carrots. My only complaint was the small size of the corned beef meant we had just enough for dinner and leftovers for lunch. Next time I'll buy double the size so we have enough for sandwiches.
The meat and vegetables were tender, the cabbage was flavorful and the whole thing (even the buttered potatoes) took next to no effort. I'll definitely be making this again next year - I'm a corned beef and cabbage convert for sure.
Corned Beef and Cabbage with Herb Buttered Potatoes
Slightly modified from Sandra Lee
Corned Beef:
3 pounds corned beef brisket with spice packet (larger if you want more leftovers)
4 carrots, cut into 2-inch pieces
2 medium onions, chopped
1 small head green cabbage, cored, roughly chopped
2 cups apple juice
1 cup water
Potatoes:
2 pounds baby red potatoes, sliced in 1/2
1/2 stick butter, softened
1 tablespoon chopped garlic
2 tablespoons chopped fresh parsley leaves
Salt and freshly ground black pepper
Preheat the oven to 275 degrees.
Put the carrots and onions on the bottom of a large Dutch oven, then put the corned beef on top. Arrange the chopped cabbage around the beef. Add the apple juice and water along with the contents of the spice packet. Cover and place in the oven. Cook 5 hours until the beef is tender. Remove the beef and vegetables to a platter and keep warm.
Add potatoes to a pot of salted water and bring to a boil. Cook until the potatoes are tender, about 12 to 15 minutes. Drain and return them to the pot. Add the butter, garlic, parsley, and salt, and pepper, to taste. Gently combine so that all the potatoes are evenly coated. Transfer to a serving bowl and serve with corn beef and vegetables.
Thứ Hai, 1 tháng 4, 2013
March Re-Make Recap
Two of my favorite bloggers, Cassie from Cassie Craves and Stephanie from Stephanie Cooks, have started doing a recap at the end of the month of dishes from their blogs that they've remade that month. What a great idea - incentive for me to look back through my blog and remake some favorite recipes.
I can't remember why I got it into my head that I needed to make biscuits and sausage gravy for breakfast one weekend but I did and it was glorious. I love this recipe because of the addition of maple syrup - it brings the flavor over the top with just a little sweetness that's counterbalanced by the hot sauce. If only it wasn't so unhealthy I'd eat it more often.
These baked chicken burritos with sour cream poblano sauce are, hands down, my favorite burrito recipe. My favorite part is the sour cream poblano sauce, although the filling is also delicious. This time I made Baby Girl a little mini burrito by cutting a smaller circle out of the large tortilla. She was a big fan.
Oyster sauce tofu with bok choy is one of my favorite tofu recipes. The sauce is silky and rich and the flavors all come together beautifully. Plus it's chock-full of veggies. And the best part - Baby Girl really surprised me while we were preparing this for dinner. She's a good eater but lately she's been asking me if she can taste things when she's helping me cook, instead of me telling her she needs to try things. She sampled the raw mushrooms (I had to sub cremini for the shitake because our supermarket was out of the latter), the raw baby bok choy and the kid loves raw tofu for some bizarre reason. Then she cleaned her plate with no fuss.
Philly cheesesteak sloppy joes are, by far, the most popular recipe on my blog (thank you, Pinterest). It's been a long time since we had them so after two different blogger friends made and posted about them I figured it was time to make them again.
And every month until May when the weather gets too hot to turn my oven to 550 degrees we have homemade pizza with various toppings.
I can't remember why I got it into my head that I needed to make biscuits and sausage gravy for breakfast one weekend but I did and it was glorious. I love this recipe because of the addition of maple syrup - it brings the flavor over the top with just a little sweetness that's counterbalanced by the hot sauce. If only it wasn't so unhealthy I'd eat it more often.
These baked chicken burritos with sour cream poblano sauce are, hands down, my favorite burrito recipe. My favorite part is the sour cream poblano sauce, although the filling is also delicious. This time I made Baby Girl a little mini burrito by cutting a smaller circle out of the large tortilla. She was a big fan.
Oyster sauce tofu with bok choy is one of my favorite tofu recipes. The sauce is silky and rich and the flavors all come together beautifully. Plus it's chock-full of veggies. And the best part - Baby Girl really surprised me while we were preparing this for dinner. She's a good eater but lately she's been asking me if she can taste things when she's helping me cook, instead of me telling her she needs to try things. She sampled the raw mushrooms (I had to sub cremini for the shitake because our supermarket was out of the latter), the raw baby bok choy and the kid loves raw tofu for some bizarre reason. Then she cleaned her plate with no fuss.
Philly cheesesteak sloppy joes are, by far, the most popular recipe on my blog (thank you, Pinterest). It's been a long time since we had them so after two different blogger friends made and posted about them I figured it was time to make them again.
And every month until May when the weather gets too hot to turn my oven to 550 degrees we have homemade pizza with various toppings.
Đăng ký:
Bài đăng (Atom)


